Interiors · Corona
Staircases: treads, balustrades and the camera that climbs
Staircases are modelled as circulation and rendered as an afterthought, which is why so many read as extruded steps. A production guide to shadow gaps, nosings, glass balustrades, the geometry architects actually check, and lighting that makes a stair worth photographing.
 INTERIORS
The staircase is a joinery brief, not a corridor
Staircases occupy the most photographed real estate in a house and get the least attention in the render. They sit in entrance halls and double-height voids, they appear in almost every camera move, and they are modelled as a swept profile and textured as one generic wood. That is why so many rendered stairs read as extruded steps rather than built joinery. A staircase is a joinery brief: a set of repeated parts, each with edges, fixings, gaps and a relationship to the light, and the renders that convince treat every tread as an object worth its own decisions.
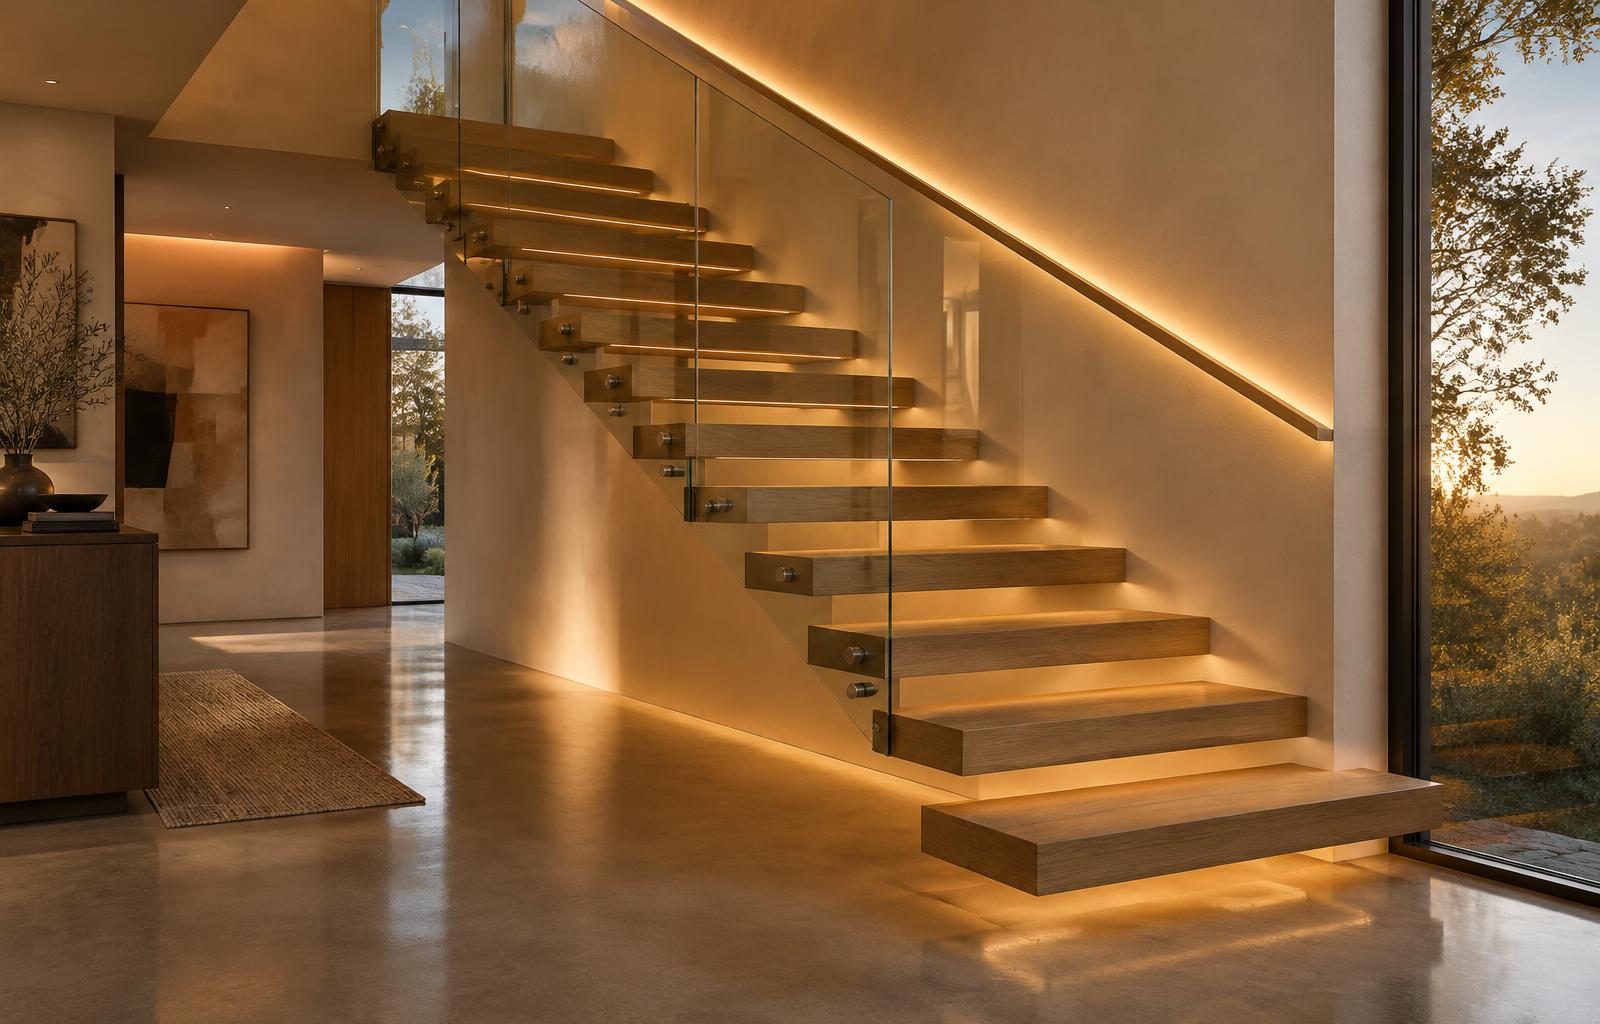
Start by knowing which staircase you are actually building, because the construction type changes everything downstream. A straight run with closed strings reads as solid and architectural. A single central steel spine with cantilevered treads reads as floating and engineered. Treads cantilevered from a wall read as sculptural and demand a convincingly robust wall. A spiral reads as geometry and lives or dies on its centre column and balustrade handling. Each family carries different detailing obligations, and the common failure is modelling the silhouette of one type while detailing it like another: a floating stair with no visible structure, or a closed stringer with impossibly thin treads.
Treads: nosings, shadow gaps and thickness
The tread is where the read happens, and two details do most of the work. The first is the nosing: the front edge of every tread catches a bright line under any raking or overhead light, and that line of highlight is what separates thirty individual treads from one grey ramp. Real nosings are softened, slightly rounded or chamfered, sometimes carrying a metal anti-slip insert, and each variant produces a different highlight character. The second is the shadow gap: floating treads float because of the 15 to 25 millimetre reveal where they meet the wall or stringer. Without that recess, adjacent surfaces fuse and the cantilever reads as painted on. It is five minutes of modelling for the single most convincing detail on the stair.
Tread thickness and material finish carry the engineered story. A 40 millimetre oak tread with visible lamination lines reads as structural; a 20 millimetre board floating in mid-air reads as a shelf. Grain direction matters too: tread grain runs along the walking direction, and the wear path on a well-used stair is subtly satin where feet travel and matte at the edges. Polished stone treads behave differently again: they mirror the balustrade, the ceiling and the window behind the camera, so they are only as good as the environment they reflect. Decide early whether the stair is new, lived-in or show-home pristine, because that decision should be visible in the finish, not just in the props.
Balustrades: glass, steel and what they reflect
Glass balustrades are the most requested and most misread element on a modern stair. The physical truth that fixes most of them: real balustrade glass is only 12 to 15 millimetres thick, so if your panels read as thick glass blocks, the problem is usually refraction settings and edge geometry rather than panel width. Set the index of refraction honestly, keep the thickness honest, and let the panel read through its edges and its reflections rather than through bulk. The fittings are what sell it: stainless standoffs with real profiles, or a shoe channel with the panel seated in it, and top rail or no top rail depending on the design. A frameless panel that meets the floor with no visible fixing reads as a sticker on the scene.
Handrails are both a legal requirement and a compositional gift. A continuous handrail draws one clean line up the pitch of the stair, and that line is what the eye follows in almost every good staircase photograph, so model it as a genuinely continuous object with proper returns at landings and newel terminations rather than segment-by-segment copies. Where the balustrade is steel verticals or rods, spacing discipline matters: real codes cap the gap that a sphere can pass through, and viewers who cannot name the rule still notice balusters spaced like a fence. The balustrade is also the scene's best reflective prop: glass and polished steel carry the window, the pendant and the adjacent room into the frame, so curate what stands opposite the stair.
The geometry clients always check
Stair geometry is the part clients check with a tape measure, so get the numbers right before any material work. Comfortable residential stairs sit around a 160 to 190 millimetre rise and a 250 to 300 millimetre going, held constant from bottom to top; the traditional comfort rule sums two rises plus one going to somewhere between 550 and 700 millimetres. A stair whose pitch visibly wanders, or whose rise differs between flights, reads as broken to any architect in the room, and architects are exactly who reviews these images. Match the pitch to the modelled floor-to-floor height, because a stair drawn to a wrong storey height is a silent, permanent error in every camera that sees it.
The same discipline extends to the parts clients forget to ask about. Nosings overlap the going below by roughly 16 to 25 millimetres, and that overhang shapes the shadow line under each tread. Winders on a turning stair keep a consistent walking line rather than a fan that dumps one tread in the corner. Landings break the run where the plan demands it, and headroom above any flight stays generous enough that nobody ducks. None of this is glamorous, but it is the difference between a stair an architect believes and one they quietly discount, and it costs an hour of modelling discipline at the start rather than a reshoot at the end.
Lighting a staircase
Lighting decides whether anyone looks at the stair at all, and the contemporary toolkit is well established. Concealed LED strips under each tread, or under a continuous soffit line, wash the riser and the wall behind, and they read as designed lighting because real projects use exactly that detail. A grazing wall wash alongside the stair picks up the texture of plaster or stone and gives the handrail its defining highlight. Keep those sources warm, in the family of 3599K interior lighting, and resist the urge to make the under-tread strips the brightest thing in the frame: the light should reveal the stair, not replace it. A visible fixture with a believable output beats an anonymous glow, on stairs more than anywhere else in the house.
Daylight does the other half of the work, especially where the stair rises through a double-height void. A tall window or a skylight throwing raking light across the flights gives each tread its own band of brightness, and that stepped light pattern is one of the most reliable beauty shots in residential visualization. Balance it the same way you would any mixed-lighting scene: let the daylight key the void, keep the artificial layers subordinate but present, and watch that the glass balustrade does not turn the daylight into a blown band of reflection. If the stair is the hero, the adjacent spaces it connects deserve enough light and furniture to read as rooms rather than black openings at the top of the frame.
Camera and composition
Cameras on stairs reward effort, because there are three distinct views and each tells a different story. From below, looking up, the stair compresses into a sculptural object against the ceiling, and the undersides of the treads and the soffit lighting carry the image. From above, looking down, the treads become a graphic pattern and the handrail line draws the eye down. The climbing view, camera on the stair itself at roughly tread height, puts the viewer in the movement and is the most emotionally engaging but the hardest to keep composed. Whichever you choose, let the handrail line and the pitch of the flights do the leading, and keep the verticals vertical: a two-point perspective correction on a stair scene is the difference between architectural and accidental.
Composition around a stair benefits from the adjacent architecture. Frame the stair with the doorway, the gallery wall or the window it lives beside, so it belongs to a room rather than floating in a render vacuum. Include the objects that say somebody uses it: a runner, a coat hook, books on the landing, a plant catching the void light. Keep the frame honest about scale, because a stair is one of the few elements where the human body's relationship to it is checked unconsciously by every viewer; a person on the third tread or a hand on the rail does more for believability than any material tweak.
The close-up check
Close with the close-up test the same way you would for tile or stone, because stairs are increasingly cropped for detail shots and social media. Render a crop at final resolution across the nosings under raking light and check the highlight line, the shadow gaps and the tread grain; render another across a standoff or the shoe channel and check that the fixing reads as machined metal rather than a grey blob. Check the thin steel and glass edges for aliasing, because balustrade lines are exactly the geometry that shimmers at distance and needs filtering rather than a blur pass. A stair that survives both crops, seen from below at the pitch the camera actually shoots, is a stair that sells the whole entrance hall around it.